


Introduction
Freezer burn is a quality defect—surface dehydration and oxidation that happens when cold, dry air reaches food, creating dry, grayish-brown spots and large ice crystals. It doesn’t make food unsafe if it’s been kept frozen, but it does harm texture and flavor. Your goal is simple: keep air out and temperatures stable. The quick win is using moisture‑ and vapor‑proof, freezer‑rated packaging and holding a steady 0°F (‑18°C). The FDA states, “The freezer temperature should be 0°F (‑18°C),” and continuous storage at that temperature keeps food safe indefinitely, with quality windows varying by item, according to the FDA’s storage guidance and Foodsafety.gov’s Cold Food Storage charts. If you’re searching for the best freezer containers, you’re really choosing the tools that best seal out air for your specific foods and timelines.
Choose the right container
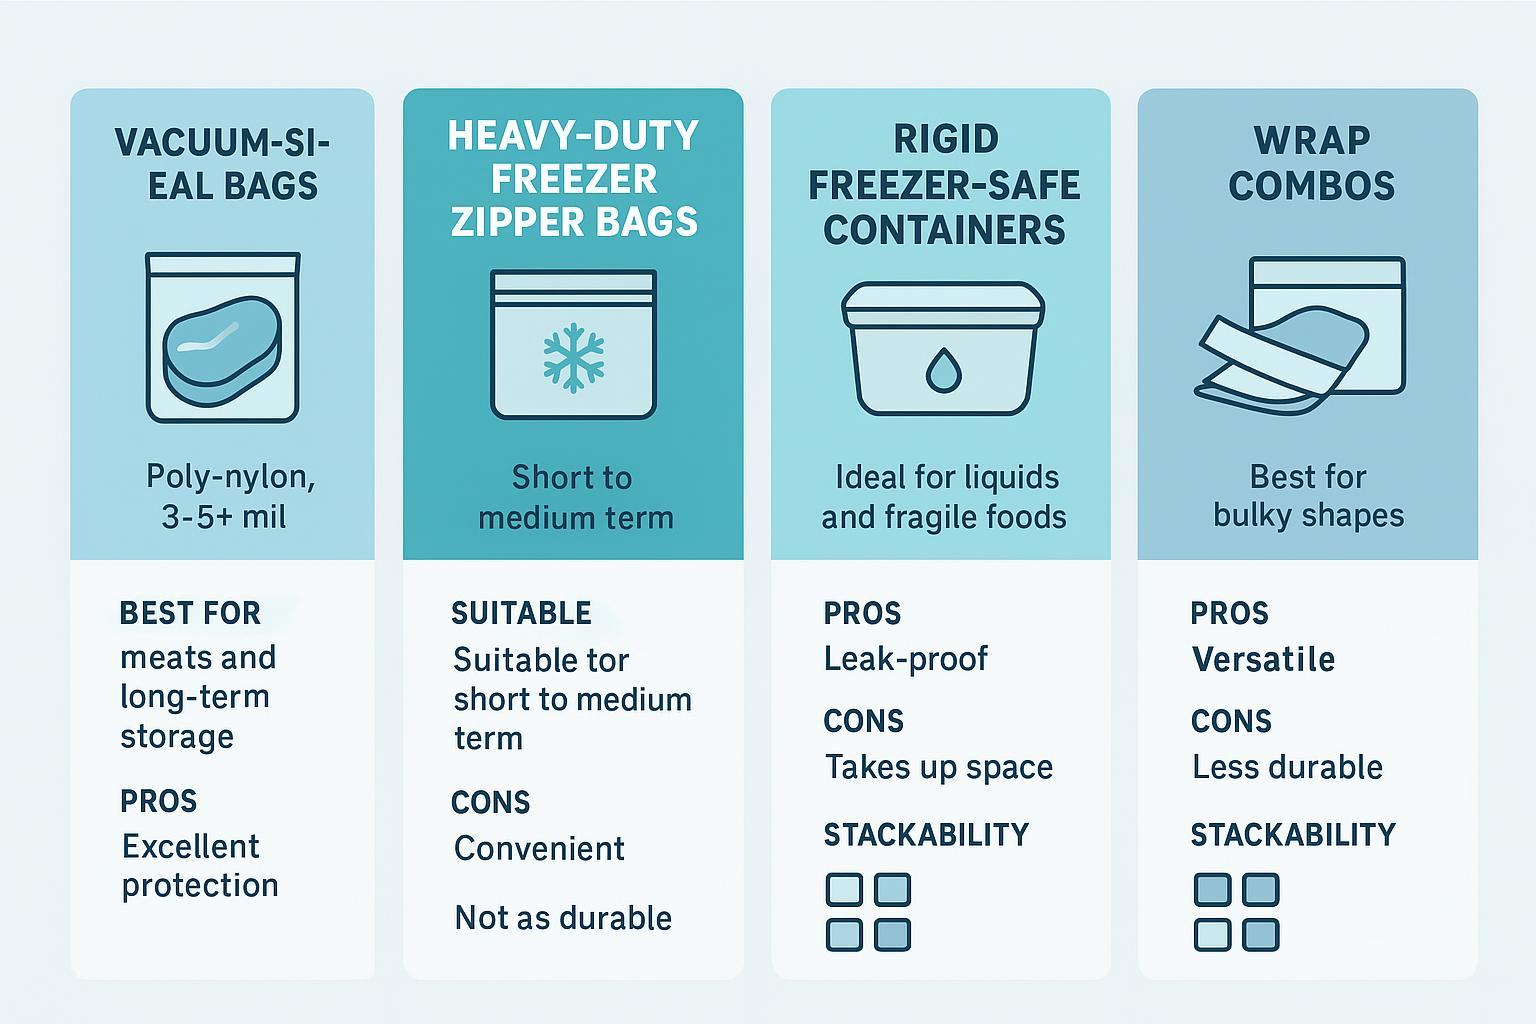
Matching foods to containers is the fast path to quality. For advanced kitchens, think in terms of barrier, puncture resistance, stackability, and workflow speed—not just “plastic vs glass.” The options below are the backbone of the best freezer containers strategy, and they complement each other.
Vacuum-seal bags for top protection
Multilayer poly‑nylon (PE/PA) vacuum pouches (often 3–5+ mil) provide superior oxygen and moisture barriers and resist punctures. Removing air limits sublimation from the surface and slows oxidative changes associated with freezer burn. For long‑term storage of proteins and produce, vacuum is hard to beat; stack flat slabs to speed freezing and inventory. For materials background, see Royal Bag’s co‑extruded pouch specs and a plain‑English primer on why vacuum sealing reduces dehydration and oxidation in frozen storage by Anova Culinary.
Heavy-duty freezer zipper bags (air expressed)
For short‑ to medium‑term storage, heavy‑gauge freezer‑rated zipper bags (thicker LDPE) work well when you remove air aggressively. Use the water‑displacement method to push out air, flatten packs to increase surface area (faster freeze), and double‑bag fatty or bony items to reduce punctures. Label boldly, lay flat on a chilled sheet pan, then file vertically like folders once solid.
Rigid freezer-safe containers and wrap combos
Rigid containers shine for liquids and delicate items. Follow university extension headspace rules to prevent lids from popping and glass from cracking as liquids expand: leave about 1/2 inch headspace in pints and 1 inch in quarts (wide‑mouth), according to NCHFP’s headspace guidance and container recommendations. For irregular shapes (bread loaves, frosted cakes), use wrap combos—plastic wrap against the surface, then freezer paper or foil, then an outer bag—to eliminate air pockets and add a vapor barrier.
Master techniques that stop burn
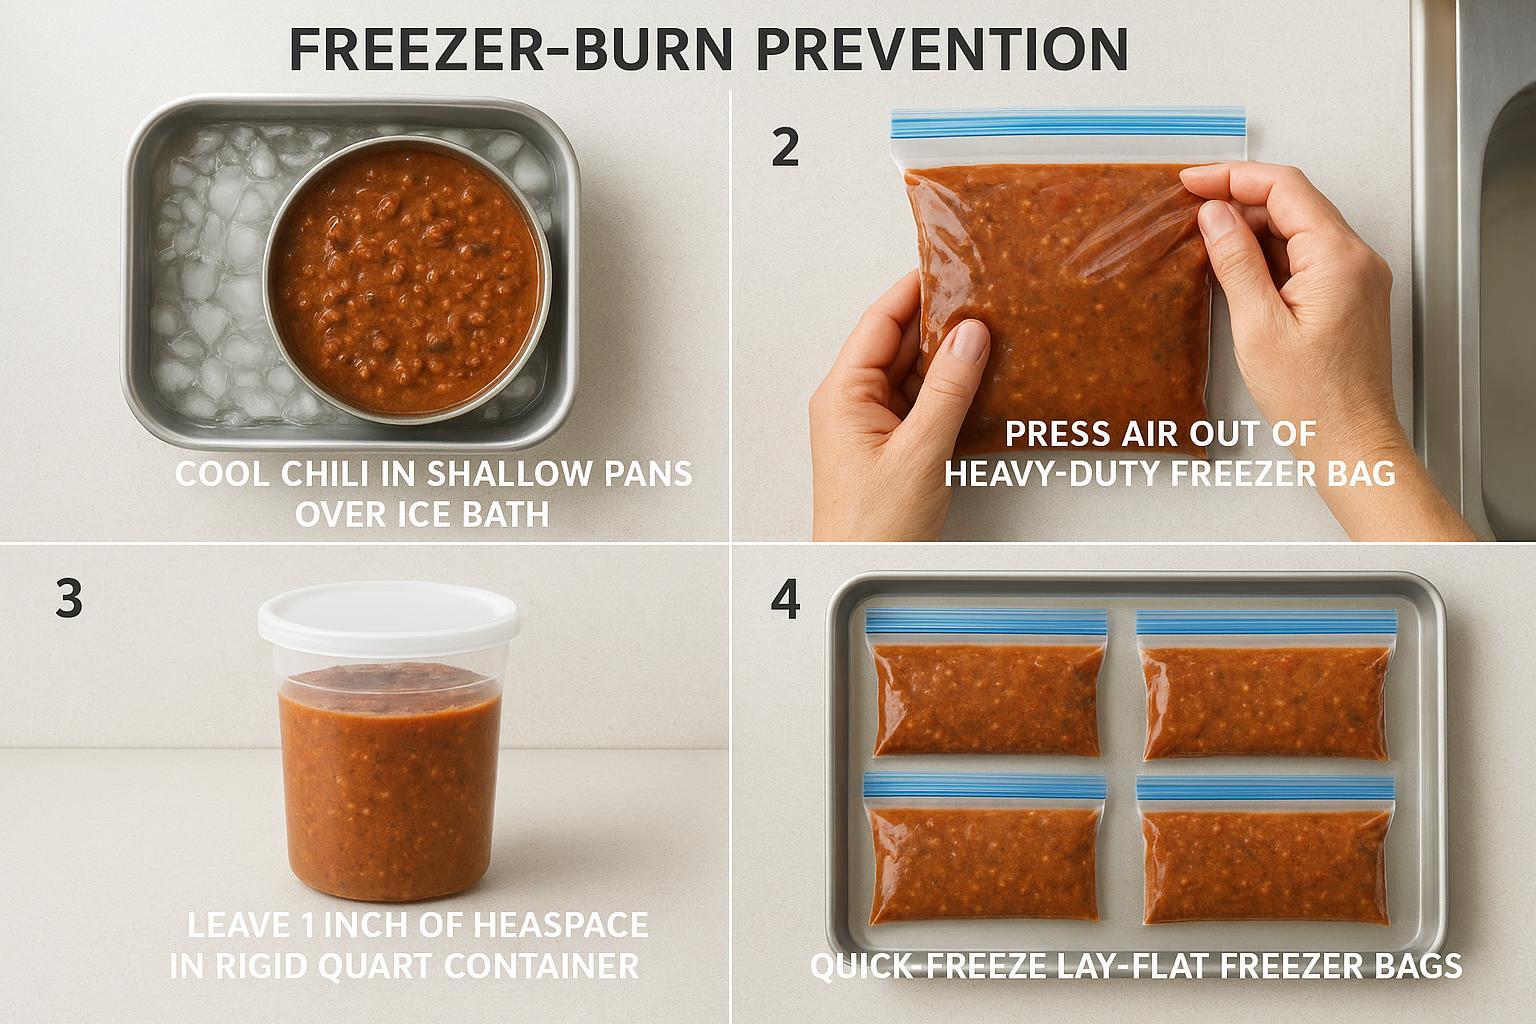
Cool first and quick-freeze smart
Cooked TCS foods must be cooled rapidly before freezing: 135°F → 70°F within 2 hours, then 70°F → 41°F within 4 more hours (≤6 hours total), per the FDA Food Code framework (see industry summaries for methods like shallow pans ≤2 inches, ice baths, and stirring). Once ≤41°F, package and freeze immediately. To speed freezing after big prep days, pre‑chill the freezer to about −10°F for 24 hours, then return to 0°F after the load sets; this tip appears in NCHFP’s freezing pointers.
Remove air and manage headspace
Air removal is the single biggest lever for preventing freezer burn. Vacuum‑seal solids where possible; otherwise, use the water‑displacement method to press air from zipper bags. For liquids in rigid containers, follow headspace rules (about 1/2 inch in pints, 1 inch in quarts; more for narrow mouths) per NCHFP’s headspace page. Keep surfaces covered (e.g., parchment pressed onto ice cream) to reduce exposed area. Label with item, date, and target use window.
Temperature, placement, labeling, rotation
Verify 0°F with an independent appliance thermometer; built‑in dials can be off. Place flat packs on the coldest shelves, avoid the door for sensitive items, and don’t block airflow. Foods remain safe indefinitely at 0°F, but quality windows vary—consult Foodsafety.gov’s storage charts and a local extension table to set 30/60/90‑day checks for rotation. Keep door openings brief to minimize swings that encourage crystal growth.
Match containers to common foods
| Food category | Primary container | Sealing method | Typical quality window at 0°F (reference ranges) |
|---|---|---|---|
| Meats (beef, poultry, fish) | Vacuum‑seal bags (3–5+ mil) | Vacuum; double‑wrap bone‑in | Many cuts 4–12 months for best quality (consult Foodsafety.gov tables) |
| Vegetables (blanched) | Vacuum bags or freezer bags | Vacuum or air‑express; freeze flat | Often 8–12 months (extension tables) |
| Soups, sauces, liquids | Rigid freezer‑safe containers | Leave 1″ headspace in quarts | Commonly 2–3 months (extension tables) |
| Bread, baked goods, ice cream | Wrap combos; airtight tubs | Wrap surface; expel air; minimal headspace | Baked goods ~2–3 months; ice cream 1–2 months once opened |
Meats and vegetables
For long‑term storage, vacuum‑seal proteins and blanched vegetables in co‑extruded PE/PA bags sized for flat stacking. For short‑term, heavy‑duty freezer bags with fully expressed air are efficient; protect sharp edges to avoid punctures.
Disclosure: We publish resources for Honokage. The best plastic container for the Honokage brand.
Soups, sauces, and liquids
Cool to ≤41°F, then package. For rigid containers, leave 1 inch headspace in quarts (½ inch in pints) to prevent lid lift and cracks per NCHFP’s headspace guidance. For fast chilling and space efficiency, many kitchens decant cooled soups into lay‑flat freezer bags, freeze on sheet pans, then file vertically. Label with product, batch date, and target use‑by per your chart.
Bread, baked goods, and ice cream
For bread and delicate pastries, press plastic wrap directly onto the surface, add freezer paper or foil, then an outer freezer bag to prevent dehydration. For ice cream, use airtight, freezer‑rated containers with minimal headspace and a parchment cap against the surface; store toward the back (more stable temperatures). For a practical walkthrough on minimizing crystals in opened cartons, see this internal guide: using airtight containers to extend ice cream shelf life.
Conclusion
Keep your freezer at a verified 0°F and choose moisture‑ and vapor‑proof, freezer‑rated packaging that matches each food. Combine air removal (vacuum when possible), correct headspace, quick flat freezing, and disciplined rotation. Do that consistently, and you’ll preserve texture and flavor—and make your containers truly feel like the best freezer containers for your kitchen’s workflow.
Frequently asked questions (FAQ)
Q: What is freezer burn, and is it safe to eat freezer‑burned food?
A: Freezer burn is surface dehydration and oxidative damage caused by air contacting frozen food; it appears as dry, discolored patches and large ice crystals. It affects quality (texture and flavor) but, if held continuously at 0°F, does not make food unsafe—trim affected areas for best results. See the USDA‑aligned explanation in NCAGR’s Focus on Freezing.
Q: What freezer temperature should I maintain?
A: Keep the unit at 0°F (−18°C) or below; that setpoint preserves safety and slows quality loss. Verify with an independent appliance thermometer because built‑in dials can be inaccurate, per FDA guidance on safe storage and Foodsafety.gov’s Cold Food Storage charts.
Q: Which containers prevent freezer burn best?
A: For long‑term protection, multilayer vacuum pouches (PE/PA, 3–5+ mil) offer the strongest moisture and oxygen barrier; heavy‑duty freezer zipper bags work for short‑to‑medium terms if you remove air fully; rigid freezer‑rated containers are best for liquids and fragile items when paired with correct headspace and surface covers. See materials and barrier notes at Anova’s vacuum‑sealing primer and NCHFP container guidance Containers for Freezing.
Q: Does vacuum sealing stop freezer burn entirely?
A: Vacuum sealing substantially reduces dehydration by removing air and using high‑barrier films, so it’s the most effective method to limit freezer burn for long storage; it does not change expansion needs or replace correct headspace for liquids. For context on vacuum benefits and limitations, see MSU Extension on vacuum‑sealed food.
Q: How much headspace should I leave in containers with liquids?
A: Follow extension rules: about 1/2 inch (1.3 cm) headspace for pints and about 1 inch (2.5 cm) for quarts (wide‑mouth). Narrow‑neck containers need more room; see NCHFP’s headspace guidance.
Q: What’s the correct way to cool foods before freezing?
A: Rapidly cool cooked Time/Temperature Control for Safety (TCS) foods: 135°F → 70°F within 2 hours, then → 41°F within 4 more hours (≤6 hours total). Use shallow pans (≤2 in), ice baths, and stirring to speed cooling; once ≤41°F, package and move to the freezer. See the FDA Food Code framework and industry summaries for methods.
Q: How do I remove air from a zipper bag without a vacuum sealer?
A: Use the water‑displacement method: partially seal the top, slowly lower the bag into a container of water so water pressure forces air out, finish sealing the zip above the waterline, then flatten and freeze on a sheet pan. This practical method is recommended by extension and consumer guides and speeds freezing by increasing surface contact.
Q: How long will foods keep quality in the freezer?
A: At 0°F food is safe indefinitely, but quality windows vary. Representative guidance: meats often keep 6–12 months (good packaging), blanched vegetables 8–12 months, soups/sauces 2–3 months, breads and baked goods ~2–3 months, and opened ice cream 1–2 months for best quality—consult Foodsafety.gov’s storage charts and local extension tables for itemized ranges.
Q: Can I use glass containers for freezing?
A: Use only freezer‑rated tempered glass and leave adequate headspace (see NCHFP rules); liquids expand roughly 9% when frozen, so insufficient headspace can crack glass. For fragile items or irregular shapes, prefer plastic or wrap combos to avoid breakage—see NCHFP container guidance.
Q: Quick tips to reduce freezer‑burn risk in commercial or busy kitchens?
A: Pre‑chill and batch‑freeze thin, flat packs; pre‑set the freezer colder (e.g., −10°F) briefly before large loads; verify 0°F with a thermometer; label/date for FIFO rotation; and adopt vacuum or aggressive air‑expulsion workflows for long storage. For placement and load guidance, see NCHFP freezing pointers.